Fire Hydrant Testing Procedure Explained: Why It Matters and How It Prevents Fire System Failure
A fire hydrant system is only as reliable as its last successful test. Many buildings have hydrants installed for years without anyone knowing whether they can actually deliver sufficient water during a fire. Hydrant testing exists to answer one critical question:
Will water come out at the right pressure and flow when lives depend on it?
This guide explains fire hydrant testing in a practical, easy-to-understand way. Instead of listing technical clauses, it focuses on what hydrant testing proves, what usually goes wrong, and how regular testing prevents catastrophic failure during real fires.
Why Fire Hydrant Testing Is Critical
Fire hydrants fail more often than people expect. Common reasons include:
- Blocked underground pipes
- Corrosion and scale buildup
- Valves stuck in partially closed position
- Fire pumps that no longer start automatically
- Air pockets inside the pipeline
Most of these problems remain hidden until a hydrant is actually tested or used during a fire. Testing is the only way to confirm real performance.
According to HSE fire and explosion guidance, fire protection systems such as hydrants must be regularly inspected and tested to ensure they operate effectively during emergencies.
What Hydrant Testing Really Confirms
A proper hydrant test verifies that:
- Water reaches the hydrant without obstruction
- Pressure remains stable during discharge
- Fire pumps start automatically under demand
- Valves open fully and smoothly
- The system can support firefighting for extended periods
Without testing, hydrants are only theoretical protection.
When Hydrant Testing Should Be Done
Hydrant testing is not a one-time activity. It is required:
- Periodically as part of routine fire safety maintenance
- After any repair, modification, or pipe replacement
- When water quality appears dirty or rusty
- Before handing over a new building or plant
- After long periods of system inactivity
Regular testing prevents unpleasant surprises during emergencies.
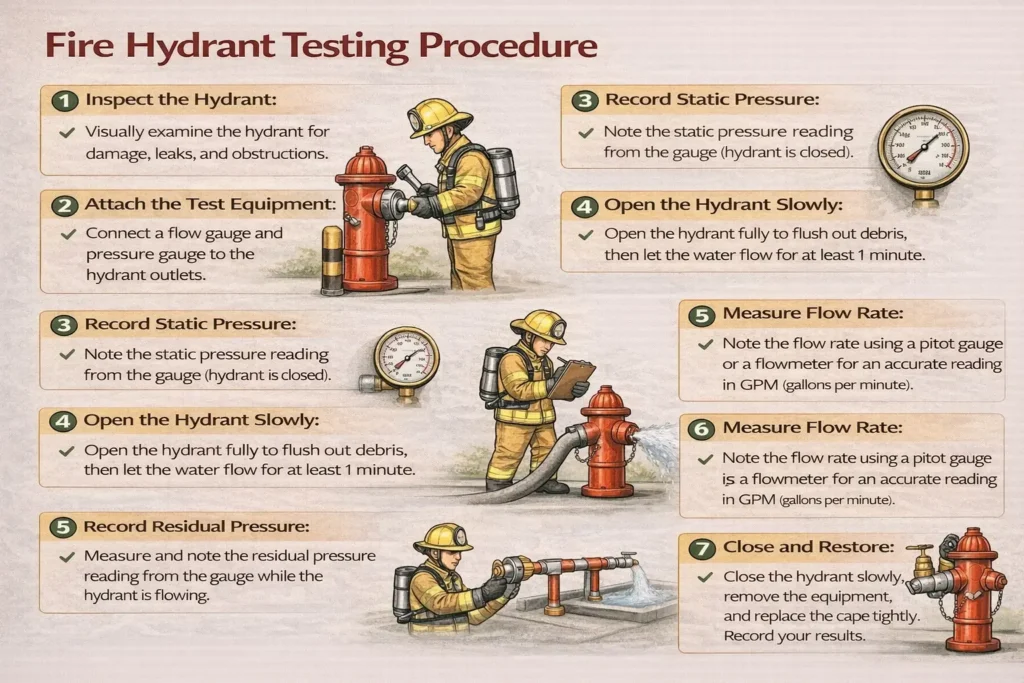
What Happens During a Hydrant Test
Hydrant testing is essentially a controlled simulation of firefighting demand.
During a test:
- Water is discharged through the hydrant
- Pressure is observed before and during flow
- Fire pumps respond automatically
- Water quality is visually checked
- Valves, hoses, and couplings are verified
Each step reveals a different type of hidden system weakness.
Why Pressure Readings Matter
Two pressure conditions are important:
Static Pressure
This shows the system’s pressure when no water is flowing.
It reflects pump readiness and system integrity.
Flow Pressure
This shows how the system behaves under actual demand.
A big pressure drop during flow usually indicates:
- Pipe restrictions
- Weak pumps
- Air trapped in the system
- Undersized piping
A hydrant that looks fine at rest can fail badly under flow.
Understanding Flow Performance in Simple Terms
Firefighters do not just need pressure, they need volume.
If water flow is too low:
- Fire cannot be controlled
- Cooling becomes ineffective
- Fire spread accelerates
Low flow is often caused by:
- Internal corrosion
- Mud or scale in underground pipes
- Closed or partially closed isolation valves
Flow testing exposes these problems immediately.
Why Fire Pumps Are Observed During Testing
Hydrant testing is one of the few chances to observe fire pump behavior under real conditions.
During testing:
- Jockey pump response is checked
- Main electric pump start time is observed
- Diesel pump readiness is verified
- Abnormal vibration or noise is detected
Many pump failures are discovered during tests, not fires.
Water Quality Tells a Story
Dirty or rusty water during testing is not just cosmetic.
It indicates:
- Pipe corrosion
- Lack of flushing
- Sediment accumulation
- Risk of valve and nozzle blockage
Poor water quality reduces firefighting effectiveness and damages equipment.
Why Valves and Hoses Are Tested
Valves and hoses are mechanical components that degrade over time.
Testing reveals:
- Valves that are hard to open
- Leaking glands and seats
- Hose lining damage
- Weak couplings
A hydrant is useless if its hose bursts under pressure.
Common Problems Found During Hydrant Testing
Hydrant testing frequently uncovers issues such as:
- Pressure far below design values
- Pumps that fail to start automatically
- Diesel pumps with dead batteries
- Blocked strainers
- Hidden leaks underground
Each issue represents a potential firefighting failure if left uncorrected.
Why Testing Must Be Done Safely
Hydrant testing involves high-pressure water and heavy equipment.
Safe testing practices prevent:
- Hose whipping injuries
- Water hammer damage
- Slips on wet surfaces
- Damage to nearby electrical installations
Controlled valve operation and clear communication are essential.
What Happens After the Test
A hydrant test is incomplete without documentation.
Results are used to:
- Schedule corrective maintenance
- Track system performance trends
- Demonstrate compliance during audits
- Satisfy insurance and regulatory requirements
Testing without follow-up is meaningless.
Real Lessons From Fire Incidents
Fire investigations repeatedly show that:
- Hydrants were installed but never tested
- Pumps failed to start during fires
- Valves were seized due to lack of use
- Underground pipes were completely blocked
In most cases, a routine hydrant test would have exposed the problem earlier.
How Often Should Hydrant Testing Be Done
While local rules vary, good practice includes:
- Routine visual inspections
- Periodic flow and pressure tests
- Pump performance verification
- Full system testing at least once a year
High-risk facilities often test more frequently.
Why Hydrant Testing Protects Lives and Property
Hydrant testing is not about paperwork or compliance.
It is about ensuring that:
- Firefighters have water when they need it
- Fire spread is controlled early
- Structural damage is minimized
- Emergency response is not delayed
A hydrant that works only on paper is a dangerous illusion.
Conclusion
Fire hydrant testing is one of the most important yet misunderstood fire safety activities. It transforms a passive installation into a verified, reliable firefighting system. By regularly testing hydrants, facilities uncover hidden failures, correct weaknesses, and ensure that water delivery will not fail during a real emergency.
A tested hydrant system saves:
- Time during firefighting
- Property from unnecessary damage
- Most importantly, human lives
Fire Hydrant System: Components, Working, Types, Installation and Maintenance
Components of a Fire Hydrant System: Detailed Explanation of Parts and Functions
How to Operate a Fire Hydrant: Step-by-Step Procedure, Safety Rules, and Technical Guidelines